实验五 手写数字识别
实验目的
掌握分类、识别问题的实质,了解各种分类问题的机器学习方法,并至少掌握一种,熟悉Python编程。
实验内容
对实验提供的手写数据库(MNIST)进行训练和测试,最终能够较为准确的识别数据库中的手写体数字。
实验要求
编写一完整的Python程序,选取一种合适的机器学习方法,对实验提供的手写数据库(MNIST)进行训练和测试,最终能够较为准确的识别数据库中的手写体数字。
数据文件共分为训练集和测试集:
训练数据集:
Training set images: train-images-idx3-ubyte.gz (9.9 MB, 解压后 47 MB, 包含 60,000 个样本)
Training set labels: train-labels-idx1-ubyte.gz (29 KB, 解压后 60 KB, 包含 60,000 个标签)
测试数据集:
Test set images: t10k-images-idx3-ubyte.gz (1.6 MB, 解压后 7.8 MB, 包含 10,000 个样本)
Test set labels: t10k-labels-idx1-ubyte.gz (5KB, 解压后 10 KB, 包含 10,000 个标签)
数字存储格式:每个数字为28*28的灰度图,按行拉伸成一个784长的向量以字节形式进行存储。为方便处理,解压后可通过程序读取到NumPy array 中。
测试结果及其格式要求:
1、该算法的精确度,并且不能低于80%;
2、有明确的结果统计形式。例:通过图表显示准确率,Loss曲线或测试结果可视化等等。(提示:显示方法可以借助Matlibplot,Tensorboard, Visdom等等)
提示:可以选取以下几种方法:
(1)利用数字的集合几何形状的特点,计算每幅图的连通域,来进行分类识别;
(2)逻辑回归算法;
(3)支持向量机(SVM);
实验原理
支持向量机(SVM):是种二类分类模型。 它的基本模型是定义在特征空间上的间隔最大的线性分类器,间隔最大使它有别于感知机:支持向量机还包括核技巧,这使它成为实质上的非线性分类器。支持向量机的学习策略就是间隔最大化,可形式化为一个求解凸二次规划的问题,也等价于正则化的合页损失函数的最小化问题。支持向量机的学习算法是求解凸二次规划的最优化算法。
实验结果与分析
1、该算法的精确度,并且不能低于80%;
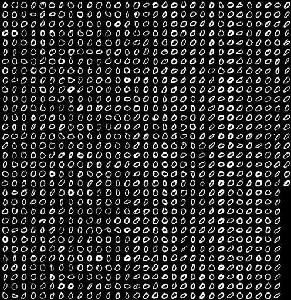
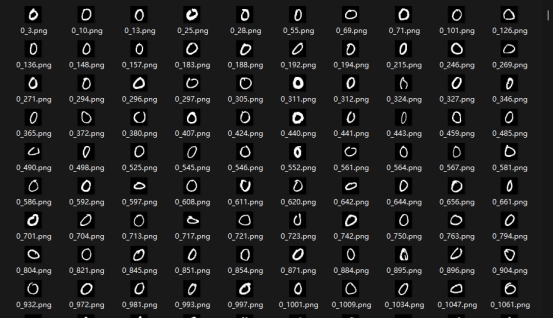
未加入噪声的测试图片如下,识别准确率为97.69 %;
2、有明确的结果统计形式。例:通过图表显示准确率,Loss曲线或测试结果可视化等等。(提示:显示方法可以借助Matlibplot,Tensorboard, Visdom等等)
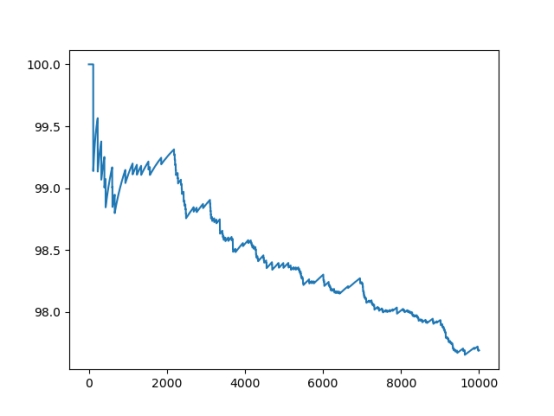
3、根据现场给出的参数,对测试数据集的图片加不同强度的噪声,然后再测试算法在测试集上的精确度。画出算法精确度与噪声强度的关系图。
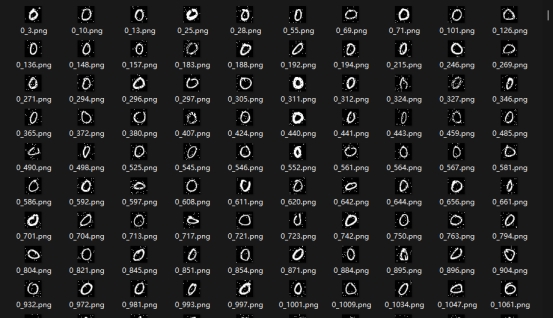
加入均值为1,方差为0.5的正态分布噪声的测试图片如下,识别准确率为97.45 %;

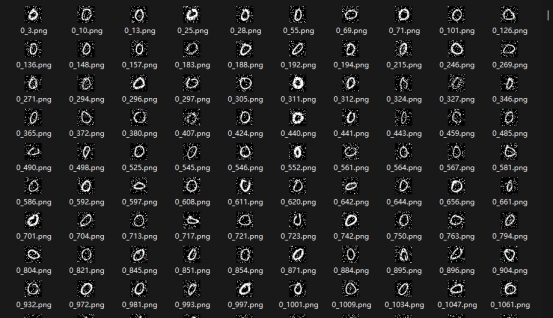
加入均值为1,方差为1的正态分布噪声的测试图片如下,识别准确率为96.65 %;
加入均值为1,方差为1.5的正态分布噪声的测试图片如下,识别准确率为73.49 %;
代码
预处理:
1
2
3
4
5
6
7
8
9
10
11
12
13
14
15
16
17
18
19
20
21
22
23
24
25
26
27
28
29
30
31
32
33
34
35
36
37
38
39
40
41
42
43
44
45
46
47
48
49
50
51
52
53
54
55
56
57
58
59
60
61
62
63
64
65
66
67
68
69
70
71
72
73
74
75
76
77
78
79
80
81
82
83
84
85
86
87
88
89
90
91
92
93
94
95
96
97
98
99
100
101
102
103
104
105
106
107
108
109
110
111
112
113
114
115
116
117
| import numpy as np
import struct
import cv2
import uuid
train_images_idx3_ubyte_file = 'train-images.idx3-ubyte'
train_labels_idx1_ubyte_file = 'train-labels.idx1-ubyte'
test_images_idx3_ubyte_file = 't10k-images.idx3-ubyte'
test_labels_idx1_ubyte_file = 't10k-labels.idx1-ubyte'
def decode_idx3_ubyte(idx3_ubyte_file):
"""
:param idx3_ubyte_file: idx3文件路径
:return: 数据集
"""
bin_data = open(idx3_ubyte_file, 'rb').read()
offset = 0
fmt_header = '>iiii'
magic_number, num_images, num_rows, num_cols = struct.unpack_from(fmt_header, bin_data, offset)
print('魔数:%d, 图片数量: %d张, 图片大小: %d*%d' % (magic_number, num_images, num_rows, num_cols))
image_size = num_rows * num_cols
offset += struct.calcsize(fmt_header)
print(offset)
fmt_image = '>' + str(image_size) + 'B'
print(fmt_image,offset,struct.calcsize(fmt_image))
images = np.empty((num_images, num_rows, num_cols))
for i in range(num_images):
if (i + 1) % 10000 == 0:
print('已解析 %d' % (i + 1) + '张')
print(offset)
images[i] = np.array(struct.unpack_from(fmt_image, bin_data, offset)).reshape((num_rows, num_cols))
offset += struct.calcsize(fmt_image)
return images
def decode_idx1_ubyte(idx1_ubyte_file):
"""
解析idx1文件的通用函数
:param idx1_ubyte_file: idx1文件路径
:return: 数据集
"""
bin_data = open(idx1_ubyte_file, 'rb').read()
offset = 0
fmt_header = '>ii'
magic_number, num_images = struct.unpack_from(fmt_header, bin_data, offset)
print('魔数:%d, 图片数量: %d张' % (magic_number, num_images))
offset += struct.calcsize(fmt_header)
fmt_image = '>B'
labels = np.empty(num_images)
for i in range(num_images):
if (i + 1) % 1000 == 0:
print('已解析 %d' % (i + 1) + '张')
labels[i] = struct.unpack_from(fmt_image, bin_data, offset)[0]
offset += struct.calcsize(fmt_image)
return labels
def load_train_images(idx_ubyte_file=train_images_idx3_ubyte_file):
"""
:param idx_ubyte_file: idx文件路径
:return: n*row*col维np.array对象,n为图片数量
"""
return decode_idx3_ubyte(idx_ubyte_file)
def load_train_labels(idx_ubyte_file=train_labels_idx1_ubyte_file):
"""
:param idx_ubyte_file: idx文件路径
:return: n*1维np.array对象,n为图片数量
"""
return decode_idx1_ubyte(idx_ubyte_file)
def load_test_images(idx_ubyte_file=test_images_idx3_ubyte_file):
"""
:param idx_ubyte_file: idx文件路径
:return: n*row*col维np.array对象,n为图片数量
"""
return decode_idx3_ubyte(idx_ubyte_file)
def load_test_labels(idx_ubyte_file=test_labels_idx1_ubyte_file):
"""
:param idx_ubyte_file: idx文件路径
:return: n*1维np.array对象,n为图片数量
"""
return decode_idx1_ubyte(idx_ubyte_file)
if __name__ == '__main__':
train_images = load_train_images()
train_labels = load_train_labels()
save_path = 'E:/train_image/'
for i in range(len(train_images)):
cv2.imwrite(save_path+str(int(train_labels[i]))+ '_'+str(i) + '.png',train_images[i].astype(np.uint8))
print('done')
test_images = load_test_images()
test_labels = load_test_labels()
save_path = 'E:/test_image/'
for i in range(len(test_images)):
noise = np.random.normal(0, 0, test_images[i].shape)
test_images[i] = test_images[i] + noise
cv2.imwrite(save_path+str(int(test_labels[i]))+ '_'+str(i)+'.png',test_images[i].astype(np.uint8))
print('done')
|
训练:
1
2
3
4
5
6
7
8
9
10
11
12
13
14
15
16
17
18
19
20
21
22
23
24
25
26
27
28
29
30
31
32
33
34
35
36
37
38
39
40
41
42
43
44
45
46
47
48
49
50
51
52
53
54
55
56
57
58
59
60
61
62
63
64
65
66
67
68
69
70
71
72
73
74
75
76
77
78
79
80
81
82
83
84
85
86
87
88
89
| from PIL import Image
import os
import numpy as np
import time
from sklearn import svm
import joblib
def get_img(path):
return [os.path.join(path, f) for f in os.listdir(path) if f.endswith(".png")]
def img2vector(imgFile):
img = Image.open(imgFile).convert('L')
img_arr = np.array(img, 'i')
img_normalization = np.round(img_arr / 255)
img_arr2 = np.reshape(img_normalization, (1, -1))
return img_arr2
def read_and_convert(imgFileList):
dataNum = len(imgFileList)
dataLabel = np.zeros(dataNum,dtype=np.uint8)
dataMat = np.zeros((dataNum, 784))
for i in range(dataNum):
if (i + 1) % 1000 == 0:
print ('已训练 %d' % (i + 1) + '张......')
img_path = imgFileList[i]
dataLabel[i] = img_path.split("/")[-1][0]
dataMat[i, :] = img2vector(img_path)
return dataMat, dataLabel
def read_all_data(train_data_path):
img_list = get_img(train_data_path)
dataMat, dataLabel = read_and_convert(img_list)
return dataMat, dataLabel
def create_svm(dataMat, dataLabel, path, decision='ovr'):
clf = svm.SVC( C=1.0, kernel='rbf', decision_function_shape=decision)
rf = clf.fit(dataMat, dataLabel)
joblib.dump(rf, path)
return clf
'''
SVC参数
svm.SVC(C=1.0,kernel='rbf',degree=3,gamma='auto',coef0=0.0,shrinking=True,probability=False,
tol=0.001,cache_size=200,class_weight=None,verbose=False,max_iter=-1,decision_function_shape='ovr',random_state=None)
C:C-SVC的惩罚参数C?默认值是1.0
C越大,相当于惩罚松弛变量,希望松弛变量接近0,即对误分类的惩罚增大,这样对训练集测试时准确率很高,但泛化能力弱。
C值小,对误分类的惩罚减小,允许容错,将他们当成噪声点,泛化能力较强。
kernel :核函数,默认是rbf,可以是‘linear’, ‘poly’, ‘rbf’, ‘sigmoid’, ‘precomputed’
0 – 线性: u'v
1 – 多项式:(gamma*u'*v + coef0)^degree
2 – RBF函数:exp(-gamma|u-v|^2)
3 –sigmoid: tanh(gamma*u'*v + coef0)
degree :多项式poly函数的维度,默认是3,选择其他核函数时会被忽略。(没用)
gamma : ‘rbf’,‘poly’ 和‘sigmoid’的核函数参数。默认是’auto’,则会选择1/n_features
coef0 : 核函数的常数项。对于‘poly’和 ‘sigmoid’有用。(没用)
probability :是否采用概率估计?.默认为False
shrinking : 是否采用shrinking heuristic方法,默认为true
tol : 停止训练的误差值大小,默认为1e-3
cache_size : 核函数cache缓存大小,默认为200
class_weight :类别的权重,字典形式传递。设置第几类的参数C为weight*C(C-SVC中的C)
verbose : 允许冗余输出?
max_iter : 最大迭代次数。-1为无限制。
decision_function_shape :‘ovo’, ‘ovr’ or None, default=None3(选用ovr,一对多)
random_state : 数据洗牌时的种子值,int值
主要调节的参数有:C、kernel、degree、gamma、coef0
'''
if __name__ == '__main__':
train_data_path = "E:/train_image/"
dataMat, dataLabel = read_all_data(train_data_path)
print("read data done!")
st = time.time()
model_path = 'E:/model/svm.model'
create_svm(dataMat, dataLabel, model_path, decision='ovr')
et = time.time()
print("Training spent {:.4f}s.".format((et - st)))
|
测试:
1
2
3
4
5
6
7
8
9
10
11
12
13
14
15
16
17
18
19
20
21
22
23
24
25
26
27
28
29
30
31
32
33
34
35
36
37
38
39
40
41
42
43
44
45
46
47
48
49
50
51
52
53
54
55
56
57
58
59
| import time
import os
import joblib
from PIL import Image
import numpy as np
import matplotlib.pyplot as plt
def get_img(path):
return [os.path.join(path, f) for f in os.listdir(path) if f.endswith(".png")]
def img2vector(imgFile):
img = Image.open(imgFile).convert('L')
img_arr = np.array(img, 'i')
img_normalization = np.round(img_arr / 255)
img_arr2 = np.reshape(img_normalization, (1, -1))
return img_arr2
def svm_test(test_data_path,model_path):
clf = joblib.load(model_path)
img_list = get_img(test_data_path)
t0 = time.time()
f = open("E:/pre_result.txt",'w')
f.write('imgName,actual,pre_result,accuracy_rate,FPS')
f.write("\n")
error_count = 0
accuracy_rate_st = []
for i in range(len(img_list)):
if (i + 1) % 100 == 0:
print ('已测试 %d' % (i + 1) + '张......')
img_path = img_list[i]
dataLabel = img_path.split("/")[-1][0]
dataMat = img2vector(img_path)
preResult = clf.predict(dataMat)[0]
if str(preResult) != dataLabel:
error_count+=1
accuracy_rate = (i + 1 - error_count) / (i + 1) * 100
accuracy_rate_st.append(accuracy_rate)
t1 = time.time()
FPS = (i + 1) / (t1 - t0)
f.write(",".join([img_path,dataLabel,str(preResult),str(accuracy_rate),str(FPS)]))
f.write("\n")
f.close()
return accuracy_rate_st
if __name__ == '__main__':
test_data_path = "E:/test_image/"
model_path = 'E:/model/svm.model'
accuracy_rate_st = svm_test(test_data_path,model_path)
print("The accuracy rate is: ", accuracy_rate_st[-1], "%")
plt.plot(range(len(accuracy_rate_st)), accuracy_rate_st)
plt.show()
|
 wechat
 alipay